
There are several types of picture framing styles, methods and techniques.
Framing is a fantastic way to showcase your artwork, photographs, and special keepsakes while adding a polished, professional touch. Whether you're new to DIY or sharpening your woodworking skills, making your own frames is a great way to build confidence with tools and materials. Let's explore some of the most popular picture framing styles and how you can create them yourself.
Standard Frame
The standard frame is a classic choice for photos, artwork, or sentimental pieces. It features a clean, rectangular shape with mitered corners that fit together seamlessly. This is a great starting project if you're new to picture framing!

How to Make It:
- Cut each corner at a precise 45-degree angle using a miter saw.
- Secure the corners with wood glue and clamps while they bond.
- For extra strength, reinforce the joints with V-nails or a biscuit joiner.
- Add a mat (border) around the artwork for a professional look.
With a simple yet timeless design, the standard frame is a staple in any DIYer’s skill set.
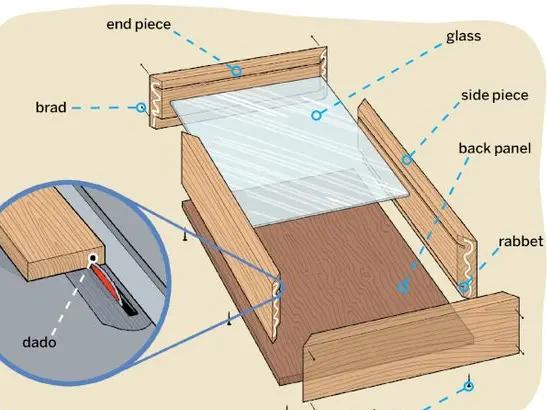
Shadow Box Frame
A shadow box frame is deeper than a standard frame, making it perfect for displaying three-dimensional objects like memorabilia, collectibles, or sculptures.


How to Make It:
- Build a deeper wooden box to accommodate your objects.
- Use spacers between the glass and the backing to create depth.
- Secure the frame using pocket hole screws and wood glue for stability.
Shadow box frames offer plenty of room for creativity and are an excellent project if you want to step up your DIY skills!
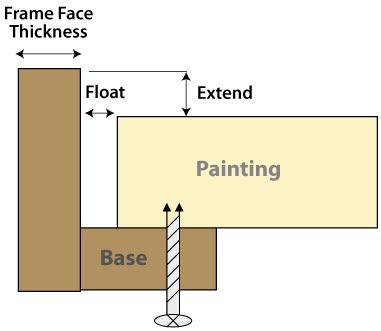
Float Frame
A float frame (or float mount) creates the illusion that the artwork is “floating” within the frame, leaving a small gap between the artwork and the inner edges of the frame. This sleek, modern style is perfect for contemporary artwork.


How to Make It:
- Create a narrow outer frame and attach it to an inner frame that holds the artwork.
- Use spacers or a raised mat to create the floating effect.
- Secure the frame with wood glue and brad nails.
- Carefully measure the gap to ensure even spacing all around.
With its minimalist appeal, the float frame is a fantastic way to give your work a gallery-style presentation.
Canvas Floater Frame
This style is designed specifically for stretched canvas artwork, giving the illusion that the canvas is floating within the frame. A variation of this is the strip frame, which offers a snug fit without the float gap.

How to Make It:
- Construct a slightly larger frame than your canvas.
- Mount the canvas inside with a small gap to achieve the floating effect.
- Secure it in place with wood glue and brad nails.
Canvas floater frames are ideal for modern and minimalist aesthetics, adding a polished and professional touch to your canvas pieces.
Final Thoughts
Building your own picture frame isn’t just about displaying artwork—it’s an opportunity to develop new skills, work with power tools, and express your creativity. Whether you're trying your hand at a standard frame, experimenting with a shadow box, or crafting a sleek floating frame, each project is a step toward mastering woodworking and DIY techniques.
So grab your tools, pick your style, and dive into your next project! With patience and practice, you’ll create stunning frames that showcase your hard work—whether for yourself or as thoughtful, handmade gifts.